Picking out a new set of tires for your vehicle can be a daunting decision. With so many varying measurements, product lines, and tread types, this process can be overwhelming for even the most seasoned hobbyists.
In this article, we’ll cover the differences between the most common types of tires on the market, why these differences matter, and how to choose the right option for both you and your vehicle!
Types of Tires
When searching for a set of tires for your vehicle, you may encounter various “categories” of tire product lines such as all-season, summer/performance, winter, and all-terrain. Each of these descriptors denotes a tire with a certain use case with a significant impact on performance, durability, and inclement-weather traction.
All-Season Tires
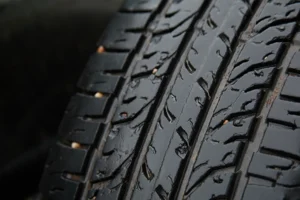
One of the most popular categories of tires for the average consumer is all-season tires. These tires strike a middle ground between the warm-weather performance of a summer tire and the wet-weather safety and control of a winter tire. While all-seasons will do neither of these as well as the tires specifically developed for those conditions, the versatility of an all-season means you may not have to have your tires switched out for the winter and summer seasons.
All-season tires generally have a directional tread pattern, which is where the sipes (channels within the tread) create a V-shaped pattern. This siping allows for water to make its way through these channels and out the side of the tire, preventing water from accumulating under the tire’s contact patch and creating a slippery barrier between your tires and the road surface.
There’s a reason all-season tires are so popular. This versatility and durability makes them perfect choices for commuter vehicles used on a regular basis.
Summer/Performance Tires
As the name implies, summer tires are produced with the intention of warm-weather driving, which allows the manufacturer to focus much more on dry road performance. Summer tires also generally use a softer rubber, giving you superior grip in the right conditions. Oftentimes these are sold as “performance” tires, as they provide the most amount of traction for spirited driving.
While unmatched in warm weather, summer tires are not produced with inclement weather in mind, and the softer tread along with non-directional siping means traction will be hard to come by in conditions like rain, ice, or snow.
For this reason, summer/performance tires are best used on vehicles that only see use during the sunny months, such as a weekend sports car or convertible. It may be possible to run summer tires year-round in areas where rainfall is few and far between even in the winter, although the rate of wear will be much faster than that of an all-season option.
Grand Touring Tires
Grand touring tires are designed to strike a middle ground between the year-round traction of an all-season and the responsive handling of a summer tire. This makes them perfectly suited for luxury or performance vehicles used for daily driving or long trips.
While on the higher end price-wise, grand touring tires provide a balance between comfort, performance, and rainy weather capability that you won’t find in any other segment of the market.
All-Terrain Tires
All-terrain tires are designed to handle both the road and the low-traction and highly uneven surfaces of off-road trails. Aggressive tread design and wide siping allow for the tires to sink into loose road surfaces such as sand, dirt, and gravel.
Though this tread allows for the tires to provide traction on various terrains, it can also cause some issues for road driving. The deep siping and aggressive tread pattern allow for more air to pass through, making these tires much louder on the street. This problem is worsened on the highway and can make for an annoying background drone on a long trip.
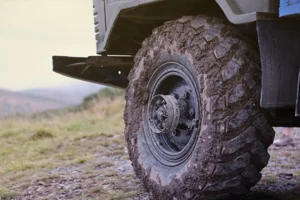
Not only does noise become an issue on the streets, so does wear and tear. The soft rubber compound used for all-terrain tires degrades quickly over asphalt and could leave you in need of new tires quicker than traditional tire options.
This isn’t to say that all-terrain tires can’t handle a little highway driving. They’re still great options for those who use their trucks or SUVs for occasional off-road trails or outdoor activities that require a more capable tire.
Mud-Terrain Tires
Mud-terrain tires take all-terrain tread to the extreme with deep siping and large tread blocks, allowing them to find traction in even the worst of conditions. A reinforced casing and durable sidewalls protect the tire from sharp rock and debris damage while on the trails, allowing mud-terrain tires to take on situations that other tires may fail in.
While they suffer from the same road noise issue as all-terrain tires, mud-terrain options provide a superior level of off-road performance while still being viable on the highway when needed. Mud-terrain tires are not intended for regular road use though, and will wear rapidly compared to traditional road tires. Weather is another limiting factor of these tires, as the low number of sipes means they can’t disperse water as quickly as an all-season tire and could become dangerous in heavy rain.
If you’re a serious off-road fanatic, mud-terrain tires provide you with the ultimate level of traction over many different surfaces. For other use cases though, they really aren’t that practical.
Competition/Track Tires
If practicality and low prices aren’t your thing, competition tires offer the ultimate level of consumer tire performance for those who are looking for a truly track-focused tire option. The soft rubber and minimal siping give the tire the most surface area to produce traction, allowing the vehicle to stay grounded around corners at high speed.
While superior in every area of performance, this increased dry-weather traction comes at a tradeoff. Competition tires lack the proper siping to be used on wet roads or other low-traction surfaces, making them dangerous anywhere but perfectly dry asphalt. The soft rubber compound also means that these tires will degrade much quicker than more durable tires, which could leave you in need of a replacement much sooner than you were hoping. Replacements aren’t cheap either, as track tires will generally run a much higher price than all-seasons or even regular performance tires.
Because of these factors, track tires are best used in, well… track cars. If you can justify the price tag, competition tires provide the ultimate level of performance for those days when you need the absolute most from your vehicle.
Tires at Matson Point S
No matter what you use your vehicle for, the tire experts at Matson Point S in Riverton can help you pick the perfect option for you (and your wallet). Give us a call today to speak with our friendly team or schedule your appointment online!