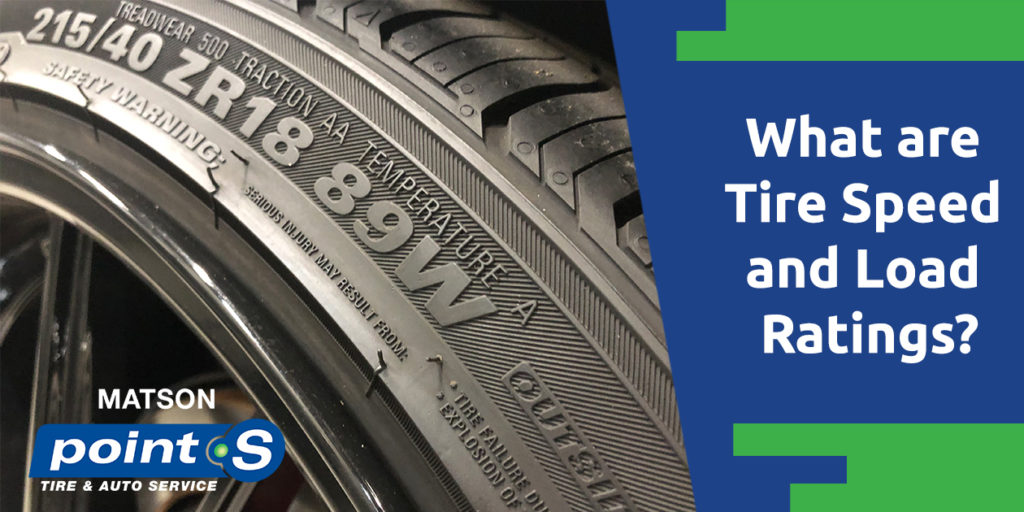
Molded into the sidewall of your tires is a series of numbers and letters indicating information like diameter, aspect ratio, tread width, and speed rating. The speed rating is expressed as a letter, a combination of letters, or a combination of letters and numbers. Load ratings are expressed as numbers between 70 and 126.
What does a tire speed rating mean?
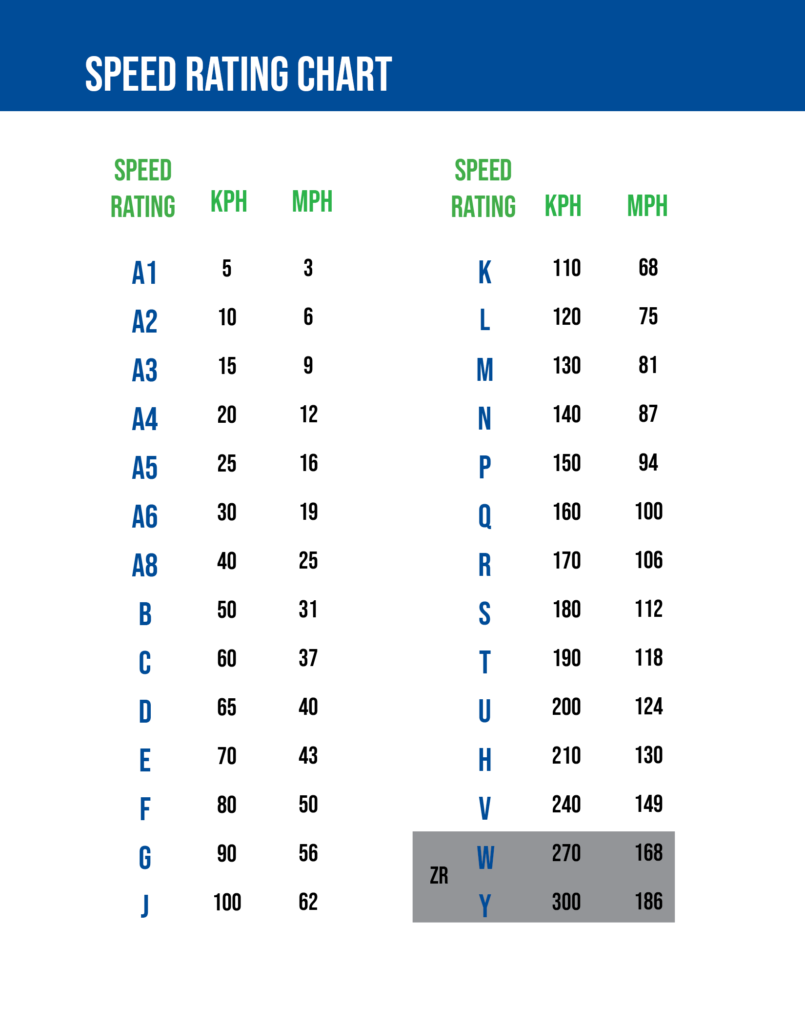
The speed rating indicates the highest speed a tire can operate for a sustained period while carrying a load within its load index. A speed rating is not an indicator of the maximum speed a tire can go in a short burst.
Typically, the higher letter used in the speed rating means the tire can sustain higher speeds and heat levels. It is important to remember that tire testing is done in a controlled lab environment, and don’t factor in real-world variables like rough roads, cold weather, and wet or icy surfaces.
What is the tire load index?
Tire load rating indicates the amount of weight it can safely support. Combing the individual load rating of all tires on a vehicle will give you the total amount of weight it can support. It is important to pay attention to the load index of your tires, particularly on trucks or SUVs that haul heavy loads. The likelihood of exceeding the load index of a tire is much higher than the chance of going over the speed rating.
How to read the speed rating and load index.
The speed rating and load index can be found together on the sidewall of your tire, usually after the tire dimensions. The load index number is first, followed by the tire speed rating.
How do tires get speed-rated?
The procedure for the ECE (Economic Commission for Europe) tire speed determines the maximum speed a tire can safely operate at for an extended time under load.
The tire is mounted to a wheel and put on a machine that simulates 80% of its load index.
The test room is kept at a temperature between 68 and 86 degrees.
The tire is rotated for 10-minute intervals at increasing speeds until the maximum speed is reached.
Once the maximum speed is reached, it is held for 20 minutes.
The tire is removed and inspected for damage and wear.
What tire speed rating do I need on my car?
The tires that come on your car from the factory should be the baseline for the speed rating you should get in the future. The factory rated tire is safe for your vehicle’s capabilities, and a lower-rated tire could be dangerous. However, you can move to a higher speed-rated tire without concern. Remember, if you have tires with different speed ratings, do not exceed the maximum speed of the lowest rated tire.
What’s the benefit of a higher speed-rated tire?
Higher speed-rated tires can have a stiffer sidewall, and marginally impact the stiffness of your vehicle’s ride. In general, the design of the tire will have a bigger impact on on-road feel than the speed rating.
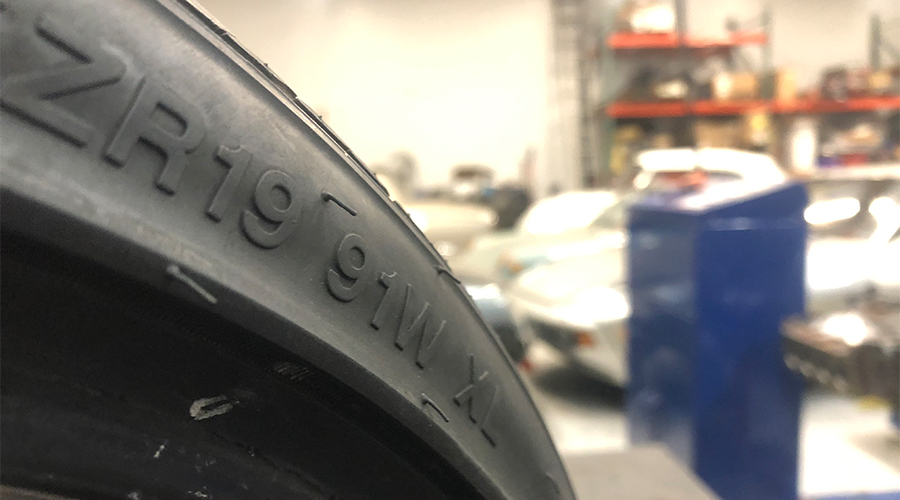
For example, tires with speed ratings in the ZR range (W, Y) are oriented toward high performance. Tires of this caliber are designed to handle the abuse of performance vehicles and track driving. Any notable difference can be attributed to the design of the tire rather than its speed rating.
Matson Point S is your destination for tires
Have more questions about speed ratings? Need advice on tires? Give us a call and talk to one of our friendly service advisors, or schedule an appointment today! We are the Salt Lake valleys tire experts.
As the summer boating season begins to wind down and temperatures start to drop, winterizing your boat is probably on your list of cold weather preparations for the fall. Cold temperatures cause residual water to freeze and expand, which can cause catastrophic damage to the engine and other components of your boat. Finding out a crack in the block has rendered the engine useless or your onboard septic system has been ruined would not be a pleasant surprise
The main goal of winterizing a boat is to remove any excess water from the engine, plumbing, and body to prevent freezing damage. Proper land storage is another step of the winterization process in areas where freshwater lakes freeze. Correct storage and water removal are the most important steps of winterizing a boat, but there are other precautions you can take to keep it safe during the winter months
General winterization
Regardless of the engine in your boat, these same winterization steps apply. Following these steps will provide the best protection against freezing damage. The steps and process, later on, will become more specific depending on the drive type of your boat.
Oil Change
After running all summer long, moisture and other impurities can end up in the engine’s crankcase. Changing the oil and filter will ensure that no surprise damage to the engine internals will occur when the weather gets cold. Be sure to run the engine for a few minutes before doing the change. The warmer and more viscous oil will be easier to remove and ensure more contaminants go out with it. When replacing the filter, be sure to prime it by filling it with fresh oil and coating the gasket to ensure it seals properly.
Inboard boat engines often need to have the oil pumped out instead of drainedReplace the oil filter with a new one. Fill it with fresh oil to prime it, and coat the O-ring with oil to seal it.Fill the crankcase with fresh, manufacturer spec oil.
Stabilize the fuel tank and change the fuel filter
Water in the fuel tank can be disastrous for an engine. Unfortunately, the ethanol additives in modern gasoline can cause issues when it sits over for long periods (like during the winter months). As it sits, a process known as phase separation can occur. Ethanol absorbs a lot of water, and phase separation happens when the ethanol absorbs enough water to separate from the gasoline. This process will create two distinct layers, gasoline on top and a layer of water and ethanol on the bottom of the gas tank.
Many issues can arise when attempting to run an engine with phase-separated fuel. In some cases, the engine may simply not start. However, damage can occur when the engine is running, and suddenly takes in the ethanol/water mix instead of gasoline. Water in the combustion chamber can hydro lock the motor, potentially destroying the engine. A more common issue with phase-separated fuel is poor performance and operation.
The only guaranteed way to prevent phase separation is to completely drain the gas tank before storage, but this is not always convenient or possible on a boat. A much easier solution is to add gas to the tank to around 95% full. As temperatures change fuel expands and contracts, allowing excess water to enter the tank. A full gas tank has a lot less “breathing” room, and can not take in as much water as an emptier one.
In addition to filling the tank, adding a fuel stabilizer will also help prevent phase separation. A fuel stabilizer increases the threshold of phase separation, allowing more water to be absorbed into the gasoline without the ethanol separating away.
Fuel stabilizer can help prevent phase separation while gas sits for extended periods of time.
By adding a fuel stabilizer and storing your boat with a nearly full gas tank, the likelihood of phase separation occurring during the winter will be significantly reduced.
Engine fogging and cylinder protection
“Fogging” the engine is a process that protects its internals from corrosion. It is done with a waxy fogging oil that is sprayed into the engine intake/carburetors while it is running to fully coat the pistons, piston walls, and other components
You can use the fogging process as an opportunity to run stabilized fuel through the engine as well. Let the motor run for a few minutes and begin spraying fogging oil into the carbs/intake. As the engine burns off the fogging oil, it will begin to choke, and white smoke will come out of the exhaust. Continue spraying fogging oil in bursts for a few minutes, and eventually choke the engine out with it
An extra precaution can be taken by removing the spark plugs and spraying fogging oil into each cylinder. After this, turn the engine over by hand or with the starter, but do not start it.
Winterizing the drive and cooling system
Just like winterizing the engine and fuel tank, the primary focus of prepping the drive for the winter months is removing water. Water in the engine block can quickly cause severe damage if the temperatures drop below freezing. Depending on the drive type, the winterization process can vary from boat to boat due to variations in the cooling system.
Winterizing inboard boats
Raw water-cooled inboard:
A raw water-cooling system cools the engine by taking in water from the lake or ocean and running it directly through the engine. The cool water absorbs heat and is then expelled back into the lake or ocean. With water running through the entire engine, winterizing a raw water-cooled system needs to be done with care to prevent freeze damage.
Open all drains on the engine to make sure all water is out.
Winterizing a raw water-cooled engine can be done in two different ways; dry storage and antifreeze. Dry storage is done by draining all water from the engine and storing it empty. While simple, this method can lead to issues if pockets of water remain trapped within the engine. Blasting pressurized air through the motor can help eliminate these water pockets, but there is no way to know for sure if all water has been removed. When draining the engine, it is critical to clear debris from all petcock, seacock, and other valves to ensure all water is removed.
A more effective method for winterizing raw water-cooled systems is to run the engine and pump antifreeze into the block. Like before, drain the water out of the block.
An electric pump can be used to force antifreeze into the water intake of a boat from a bucket.
Using an antifreeze that meets the manufacturer’s recommendations, allow the engine to take in antifreeze from an external reservoir. Remember that until the engine is up to temperature, the thermostat will stay closed on some engines. Waiting until the engine is warm before introducing the antifreeze will ensure complete protection.
Watch the exhaust until the liquid exiting the engine matches the color of the antifreeze, then shut off the engine. The engine is now ready to be laid up for the winter.
Closed system inboard:
Some boats use a cooling system that combines the water circulation of the raw water system, and the conventional closed-circuit coolant system found in cars. This system uses a heat exchanger (the marine equivalent of a radiator) that allows engine coolant to come in close contact with cold lake/ocean water, extracting heat. Winterizing a boat with this type of cooling system is simpler than conventional raw water setups. The lake/ocean water side of the system is winterized by pumping in antifreeze exactly like a raw water setup.
The engine block itself will be protected from cold temperatures year-round due to its supply of conventional coolant. It can be beneficial to change this coolant, but it is not required to protect the boat from cold temperatures.
Winterizing sterndrive boats
When winterizing inboard/outboard boats, it is important to determine if your boat takes in water through the lower unit (outdrive) or through the hull. Boats that take in water via the lower unit will need to use muffs to pump water into the engine while it is operating out of the water. Sterndrive boats with this style of water intake will follow slightly different winterization steps than boats with through-hull intakes. For boats that require muffs, run the engine until it is up to temperature. Run tubing from the muffs to a bucket of antifreeze and allow the engine to take in the coolant until you see it coming out of the exhaust.
Antifreeze can be seen coming out of the exhaust of this sterndrive, indicating the block is purged of water. On traditional inboards, watch the exhaust port for antifreeze.
At this point, the engine and lower unit have been filled with coolant and prepped for winter storage. For boats with through-hull intakes, follow the same steps and allow antifreeze to enter the engine and lower unit via the hull.
Sterndrives require prepping the lower unit for storage. The process of winterizing the lower unit can vary depending on the brand. Generally, greasing the moving components through grease fittings. Changing the gear lube should be done yearly. Milky gear lube can indicate water is present in the unit and a pressure test will be needed to find the bad seal.
Locate and remove drain plugs on the lower unit to allow the gear oil to drain.Allow gear oil to drain form the lower unit.Pump new gear oil into the gearcase.
Winterizing outboard boats
The steps for winterizing an outboard vary depending on the make and model, but the general procedure follows a similar path to what is done for inboards and sterndrives. Change engine oil, gear oil, stabilize the fuel supply and run antifreeze through the engine. Look at the manufacturer’s recommendations for winterizing to be sure you are preparing it for lay-up properly.
Winterizing jet drive boats
Much like outboards, winterizing a jet drive varies depending on make and model, so make sure to consult the owner’s manual or manufacturer website to make sure you are following the right steps. For smaller watercraft like jet skis, winterizing consists of stabilizing the fuel, and running the engine out of the water for short stints to blow any remove excess water from the jet system. For larger boats running jet drives, winterizing may need to be done by a professional.
Marine Plumbing
Engine damage is the most common result of improper winterization, but there are other areas of the boat that can retain water, leading to potential freeze damage.
Marine Head:
If your boat has an onboard toilet or marine head, it is crucial to winterize this system to prevent freeze damage. The steps for winterizing the marine head and septic system on a boat are pretty straightforward:
1.) Start the process by emptying the holding tank and running fresh water through it. This step ensures the system is clean and sanitized when you take your boat out next season.
Empty and sanitize the holding tank so it is clean and ready to go at the start of next season.
2.)Next, run antifreeze through the marine head by removing the raw water intake hose from the seacock valve and putting it in a reservoir of antifreeze. Some boats use a closed system instead of raw water. In this case, empty the water supply and replace with antifreeze. Flush the head to suck antifreeze from the bucket into the septic lines and holding tank
Ensure antifreeze runs through every part of the marine head to prevent freeze damage.
3.) Close off the seacock and double-check raw water strainers to ensure they have antifreeze in them.
Fresh Water System:
The process for winterizing a boat’s freshwater system is relatively simple.
The steps are as follows:
1.) Begin the process by turning on the water pump and allow all water fixtures to run until the tank is empty. Fill it with antifreeze and turn on the hot water side of the water fixture the greatest distance from the water pump.
The fresh water pump and tank supply clean water to the fixtures on your boat.
2.) Once antifreeze is flowing from the fixture, close the hot side and open the cold, repeating the process until antifreeze comes out.
On the left side, the fixture has not finished purging the system of water. On the right, antifreeze is coming out.
3.) Repeat this process from the furthest fixture back to the one closest to the water pump, remembering to do sinks and showers. Once the antifreeze is flowing from all fixtures, the system is ready for winter storage.
What antifreeze should I use to winterize my boat?
Remember to use nontoxic antifreeze. Many lakes double as water supplies for communities, and all bodies of water are homes to animals and support ecosystems. Additionally, using a toxic antifreeze in your boat’s drinking water storage system is not a great idea. RV antifreeze is a good choice to use for boat winterization. It’s made with either propylene glycol or ethanol, making it nontoxic to the environment and people. Closed system inboards utilize a traditional toxic coolant in the engine, but this will not be at risk of entering the boat’s fresh water supply or the lake, as it remains in the engine circuit.
Storage:
There are several ways a boat can be stored while it is laid up for the winter. Storing your boat safely is as important as other parts of the winterization process to prevent external damage during harsh winter weather.
Cover it up:
This one may be obvious, but ensuring your boat is properly protected with either a fitted over or well-secured tarp will protect it from the elements. If you choose to use a tarp instead of a fitted cover, remember to make sure it fits snug. Any loose material can become a trap for rainwater or snow, which can weigh down the tarp. This additional weight can add stress to the supports used to store your boat as well.
Location:
If you are storing your boat on your property, try to lay it up at a distance from roofs and trees. Roofs can poor large quantities of water onto a boat throughout its layup period. Trees bring several hazards to boats such as damage from falling branches and sap dripping on to the boat.
Types of Storage:
Cradles
A cradle is one of the most secure ways to store a boat. Cradles support the heaviest parts of the boat body and allow it to sit safely upright while out of the water
Jack stands
Jack stands are a cost and space effective solution. When using jack stands, it is important to know the areas of your boat’s hull that need the most support. To provide stability in high winds, jack stands need to be placed at the widest possible points on the boat. Lastly, if solid concrete or packed dirt is not available, using plywood underneath the jack stands will prevent them from sinking when the ground gets wet.
Trailer
If you trailer your boat to and from the lake, leaving it on the trailer during the winter can be a secure solution. The trailer will support all the critical points of the boat during windy or muddy conditions, much like a cradle. The trade-off is security; a trailered boat can be stolen much easier than one in a cradle or on jack stands. Have a secure yard, garage or barn will keep the risk of theft low.
Storage Racks
Dry storage racks offer stable and secure storage. Storage racks can store many boats together . If you are uncomfortable with laying your boat up on your property, dry storage racks might be a good solution.
Lifts
For those with lakeside property, storing your boat on a lift by the water makes the transition from lay-up to boating season much easier. Rain and snow can add significant weight to the boat and potentially break the lift. Additionally, lifts are not stable in high winds. If you live in an area that sees harsh winter weather this storage method may not be best.
Other tips
Check on your boat
This is probably the easiest preventive step you can take to ensure you don’t run into any problems. Visit your boat every few weeks during the winter or immediately following bad weather. Check the cover for tears or water/snow buildup. Make sure the support system you are using is keeping the boat level. Tighten the cover and remove built up water and snow to keep stress off of the supports.
Do you need help winterizing your boat?
We are boat experts at Matson Auto and Marine. Our skilled technicians can assist you with any winterization needs, backed by a guarantee if the winterization is done before the first freeze of the year. Give us a call or schedule an appointment today!
Download a copy of our boat winterization checklist to help you through the process if you do it yourself!
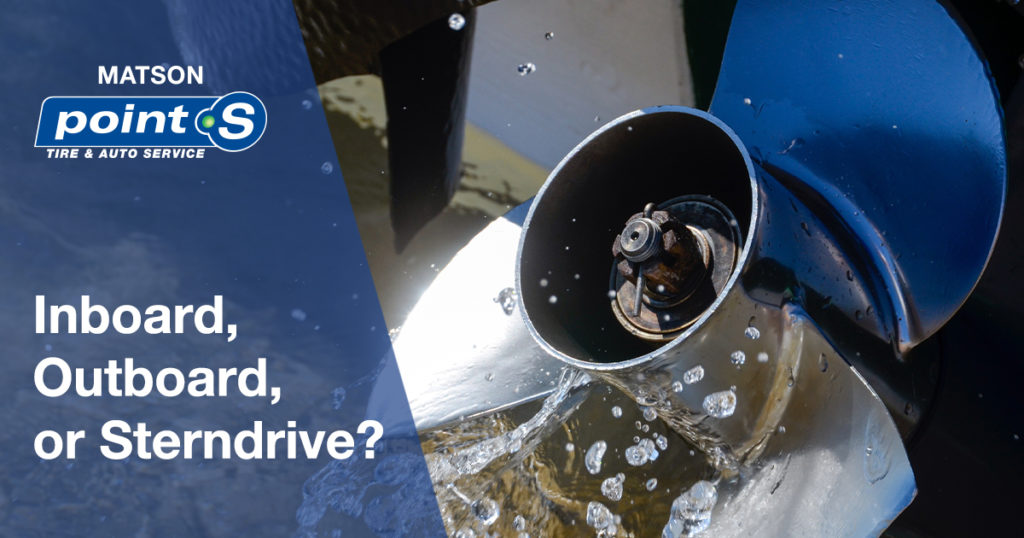
Inboard, outboard and sterndrive boats. What’s the difference?
Boats use a wide variety of propulsion systems to get through the water. The terminology surrounding drive types can be confusing. Even certain drive types have subvariants that offer advantages and disadvantages depending on the activities you like to do with your boat. Some drive types are better suited for water sports like wakeboarding and waterskiing, while others allow boaters to access shallow water for fishing. Continue reading to learn about the uses, advantages, and disadvantages of inboard, outboard, and sterndrive boat propulsion.
We are boat experts at Matson Point S. Our technicians have the training and experience to assist with all your marine needs.
Inboard boats
Inboard propulsion systems are extremely popular in watersport boats due to the small, clean wake created by the position of the propeller underwater. They are also easier to repair and service when compared to sterndrives and outboards. Inboard setups have two variations, the direct drive, and the V-drive.
Boats using a direct drive inboard have their engine positioned in the center of the boat with a drive shaft running straight to the propeller positioned underneath the boat in the rear. On smaller boats, it is easy to see the location of the engine compartment in the center of the passenger area.
Direct Drive
Boats using a direct drive inboard have their engine positioned in the center of the boat with a drive shaft running straight to the propeller positioned underneath the boat in the rear. On smaller boats, it is easy to see the location of the engine compartment in the center of the passenger area.
Advantages of direct drives
Very little power loss when compared to a V-drive
Extremely accessible engine, making repairs and service easy
Better weight distribution making it easier to get the boat on plane
Disadvantages of direct drives
Engine location takes up space in the center of the boat, resulting in less seating space than V-drive setups.
Inability to adjust the trim
V-Drive
A V-drive setup places the engine in the rear of the boat behind the transom. The engine is placed backward when compared to the direct drive, with the driveshaft first exiting toward the front of the boat then quickly turning and angling down and back toward the stern.
Advantages of V-drive inboards
Free space in the center of the boat.
Creates a platform on the stern of the boat making fishing and other activities easier.
Small wake is ideal for water skiing and other water sports
Disadvantages of V-drive inboards
The position of the engine against the rear can make repairs and service difficult
The V angle of the drive shaft results in a bigger power loss than direct drives
Inability to adjust the trim
Sterndrive boats
A sterndrive is an arrangement that combines the elements of inboard and outboard systems. For this reason, sterndrives are also referred to as inboard/outboards. Sterndrives employ an inboard engine, often a marinized automotive engine, and drive the boat via a lower unit similar to outboard motors.
Advantages of stern drives:
The ability to trim the lower unit like an outboard motor
A larger, more powerful inboard engine that will outperform outboard motors.
The engine is at the stern allows for more seating space and provides a larger rear platform
Disadvantages of stern drives
Continuous exposure to water can damage the lower unit
Outboard boats
Outboard engines consist of an all-in-one unit positioned on the rear of the boat. Larger boats can use multiple outboard units together to generate more power. Outboard motors offer several advantages that inboards and sterndrives cannot.
Advantages of outboards
Lightweight.
Outboards can be lifted completely out of the water, allowing access to shallow areas other boats cannot get to.
Very easy to work on as the entire engine is exposed and out of the water.
Outboard motors do not require the same level of winterization
Disadvantages of outboards
Lacks the power and torque seen in inboards and stern drives (the gap is closing, modern outboards can be quite powerful, and more than one can be used simultaneously)
Noisier than the alternatives due to the engine being exposed.
Older 2-stroke outboards are being banned due to emissions.
Which drive is the best?
Ultimately, the choice between an inboard, outboard, or stern drive comes down to personal preference, the activities you do with your boat. Avid fisherman may find the maneuverability and low weight of an outboard motor the most ideal. A water skier may look to an inboard set up to take advantage of a larger engine and small wake. Someone looking for a bit of versatility may consider a sterndrive to take advantage of some of the benefits offered by both inboards and outboard. Other factors like family size and boat size may contribute to the choice, as a direct drive inboard engine can take up a lot of space in the boat.
Contact Matson Point S
Regardless of the drive on your boat, Matson Point S Tire and Auto has trained technicians who will help you maintain or repair your boat and keep you out on the water. Schedule an appointment or come visit us!
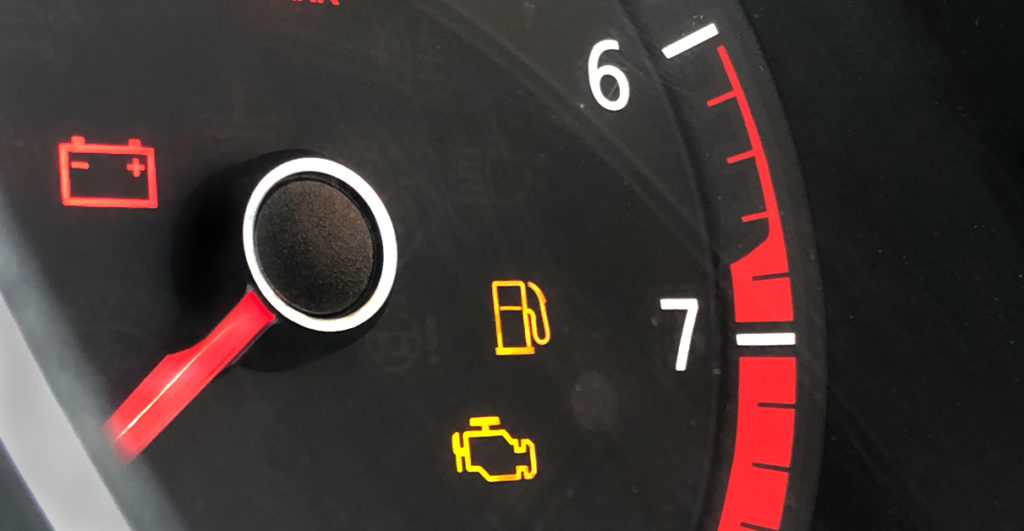
When it comes on it’s easy to assume the worst. Thoughts of expensive repairs and the hassle of getting around without your car pop into your head. Is my car damaged? Should I continue to drive it? How do I get it fixed?
There are many potential issues that can cause the light to come on. This means it is important to get your car looked at by a technician as soon as possible even if it seems to be running normally. Taking care of the issue causing a check engine light quickly can save your car and wallet. A minor issue can cause serious damage if left unaddressed.
The check engine light is a warning light on your dash that comes on when there is a problem with your vehicle. The light is triggered when your vehicle’s ECU (engine control unit) detects a malfunction within the various systems it oversees. There are a wide variety of reasons why the light can come on. It can be something as simple as a loose gas cap to more serious issues like engine misfires and emissions problems.
How is a check engine light used to find an issue?
In order to determine the exact cause of the problem, the code causing the check engine light needs to be read from the ECU by a technician. Each code corresponds with a specific fault in the system that can be used to determine the exact issue. Based on the code, your technician will be able to tell you the likely reason the light came on.
Read on to learn about some of the most common issues that trigger a check engine light.
Common causes of a check engine light
Remember, there are many different reasons a check engine light can come on. This list contains some of the more common causes.
1. Catalytic converter and oxygen sensors
One common cause of a check engine light can be related to your vehicle’s catalytic converter and oxygen sensors. The catalytic converter is a device in the exhaust which is responsible for reducing the amount of toxic emissions from the engine. When the catalytic converter is not functioning properly (which could be caused by a clog), you can experience a check engine light.
Failed oxygen sensors before and after the catalytic converter can also cause trigger a fault.
2. Fuel cap
A loose, damaged, or missing fuel cap can cause a fault by triggering an evaporative emissions control code. The EVAP system in your car is designed to prevent gasoline fumes from escaping, which are harmful to the environment. If the check engine light comes on in your car, checking the tightness and seal of the gas cap is a quick way to determine if this is the problem.
3. Mass airflow sensor
Another potential cause of a check engine light is a faulty or failed mass airflow sensor. The mass airflow sensor monitors the intake of air into the engine, which the ECU uses to determine the correct amount of fuel. When the mass airflow sensor is not functioning correctly, the engine will not run as it should. This can result in the light coming on.
4. Vacuum leak
Your car’s vacuum lines are subject to extreme temperatures and elements, and as a result can crack and dry rot over time. When the vacuum system has a leak, air is entering the system without passing through the mass air flow sensor. This “unmetered air” can cause a host of issues. In addition to a check engine light, you may notice your car idling at a much higher RPM than normal. It may even change frequently between a high and low RPM.
Why is my check engine light blinking?
A blinking check engine light is an indicator an active malfunction which is a much more serious issue that needs to be addressed as soon as possible. If you encounter a blinking check engine light, pull over and do not continue driving until a technician can look at it.
The most common cause of a blinking check engine light is a misfire, which itself can be caused by a variety of issues. Here are some of the most common causes.
1. Spark
The ignition system in your vehicle is responsible for igniting the mixture of gasoline and air in the cylinder. The result is an explosion that drives the piston, propelling your car. The ignition system contains spark plugs, coil packs/distributors and wires that receive electrical current from the alternator and battery. If any of these components fail it can cause a cylinder to misfire.
If left unaddressed, unburned fuel will be deposited in the catalytic converter, resulting in very high temperatures and eventual damage. Replacing a catalytic converter can cost thousands of dollars. To prevent this from happening, pull over immediately if your check engine light begins to blink and call a tow truck.
2. Fueling
Fuel injectors spray a controlled amount of fuel into the combustion chamber of each cylinder. If an injector goes bad or becomes clogged, the cylinder will not get the proper amount of fuel needed. Not only can this condition cause a flashing check engine light, it will result in noticeable rough idling and poor acceleration. Although less common, a faulty or failed fuel pump can cause a similar misfiring issue.
Let us help!
While these are some of the more common causes of a check engine light, there is no way to know for certain without a service technician interpreting the fault codes. Often the code alone does not tell the entire story, and determining the root cause of the problem requires some investigating. Remember, ignoring the light and continuing to drive has the potential to damage your vehicle, leading to much more costly repairs.
Come visit Matson Point S Auto and Tire or schedule an appointment to let us diagnose your check engine light. Our skilled and friendly technicians will ensure your car is running as it should.
We use cookies to ensure that we give you the best experience on our website. If you continue to use this site we will assume that you are happy with it.