
Symptoms of a Bad Thermostat In Your Vehicle
Your vehicle’s thermostat plays a major role in keeping your engine running at a regulated temperature. If the thermostat is broken, it can cause serious engine damage. In this article, we go over the primary function of the thermostat, how to diagnose a bad/faulty thermostat, and how to go about replacing your vehicle’s thermostat.
What Does a Thermostat Do?
Responsible for regulating your engine’s temperature, the thermostat is a small valve that controls coolant flow. If the engine is cold, the valve stays closed to let it warm up. However, as the engine warms up, the thermostat will slowly open, allowing coolant to flow through the radiator. This process enables the engine to remain at a safe operating temperature at all times.
Within your vehicle, you’ll typically find two types of thermostats: spring-loaded mechanical thermostats or electric thermostats. Regardless of the thermostat type, a failure is a major safety concern and shouldn’t be ignored. If the problem is left unchecked, your engine will overheat and potentially lead to costly repairs.
What Are The Signs of a Bad/Failing Thermostat?
- Overheating and Overcooling
- Coolant Leaking
- Strange noises coming from the radiator
- Temperature Changes
- Heater Problems
Overheating and Overcooling
Overheating is the most common symptom of a failing thermostat. Commonly due to corrosion or aging, your car’s thermostat can get stuck in a closed position. If this happens, the thermostat won’t allow the coolant to reach the radiator, overheating the engine and potentially causing severe damage.
On the other end of the spectrum is overcooling. This happens when the engine can’t reach the right temperature to properly function. In this scenario, the thermostat is stuck open and overflows the radiator with coolant, drastically reducing the engine life cycle.
The best way to prevent either of these scenarios is to always watch your dashboard temperature gauge.

Coolant Leaking
If you have noticed liquid dripping under your car, it is a sure sign of a coolant leak. This doesn’t mean the thermostat itself is leaking, as it contains no coolant. Instead, a gasket may be the source, preventing coolant from seeping out of the thermostat housing. Check the housing for any signs of leaks, drops, drip marks, and deposits.
Strange sounds coming from the radiator
When your thermostat is faulty/failing, it’s important to be on the lookout for strange noises coming from your radiator. You may hear rumbling, boiling, or knocking. All these signs point to an issue with your car’s cooling system.
Temperature Changes
Another symptom to look out for is an erratic, fluctuating temperature gauge. The thermostat affects the temperature of air that flows in your vehicle through the vents. If it suddenly changes from hot to cold or vice versa, this is a clear indicator of a failing thermostat.
Heater Problems
If the thermostat is stuck in an open position, no matter how high you turn up the heater, you won’t get hot air flowing through the vents. This is a clear indicator of a failing thermostat. This issue is commonly discovered during the winter season.
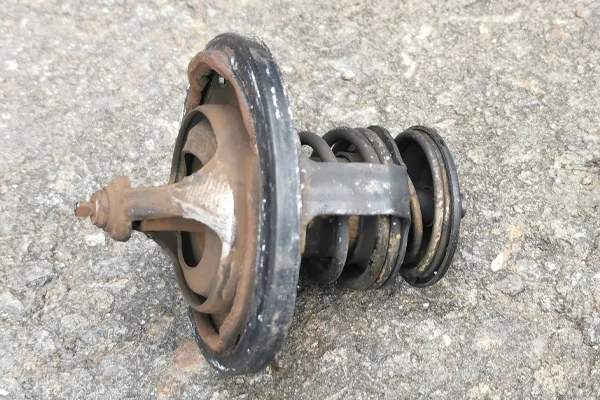
Changing/Testing Thermostat Guide
For those who want to do it themselves, you likely already know where your thermostat is located; changing it isn’t too complicated. In most cases, it’s near the top of the engine where the top radiator hose meets the engine block. When replacing the thermostat yourself, you’ll need a new thermostat, fresh coolant, a drain pan, basic hand tools, and a new gasket.
Step 1: Find a two-gallon container or a large bucket to catch any coolant that will spill during the process. You’ll need to reuse this fluid to refill the radiator later.
Step 2: Make sure the engine is completely cool before starting. Once cooled, locate the thermostat by following the radiator hose and remove the clamp holding it in place.
Step 3: Position a drain pan under the radiator. Drain enough coolant so that the level drops below the thermostat housing.
Step 4: Disconnect the upper radiator hose from the thermostat housing. Remove the bolts securing the housing and carefully lift it off the engine.
Step 5: Take out the old thermostat. Thoroughly clean the surfaces of both the thermostat housing and the engine block to ensure a good seal.
Step 6: Place the new thermostat into position with the spring side facing down, then secure it with the bolts.
Step 7: Put a new gasket on the cleaned mating surface, then reinstall the thermostat housing.
Step 8: Reattach the upper radiator hose and refill the radiator with the coolant you drained earlier, or use fresh coolant if needed.
Step 9: Start the engine and let it reach operating temperature. Check for any leaks around the thermostat housing and hose connections.
If you’re not confident or experienced working on your car’s cooling system, don’t risk it. A sloppy thermostat replacement can lead to issues with your cooling system, overheating, or leaks.
Cooling System Repair in Riverton, UT
If you’re looking for cooling system repair in the Riverton area and beyond, the expert mechanics at Matson Point S Tire & Auto Service are the answer you have been looking for. We’re committed to friendly, personalized service, along with efficient and effective cooling system repair. Schedule an appointment at Matson Point S Tire & Auto Service for cooling system repair today, or stop by at 1842 W 12600 S, Riverton, UT 84065.